The Irresistible Charm of Homemade Pistachio Baklava: A Culinary Journey
There are certain desserts that transcend mere sweetness, offering a symphony of textures and flavors that linger long after the last bite. Pistachio baklava is undoubtedly one such culinary masterpiece. While its delicate layers and rich, nutty aroma might suggest an intimidating undertaking, the truth is that crafting this exquisite treat at home is not only achievable but immensely rewarding. The unparalleled taste of fresh,
homemade pistachio baklava simply outshines any store-bought version, inviting you to create delicious memories right in your own kitchen. This article will delve into the storied past of baklava, explore its profound cultural impact, and guide you through the satisfying process of making it your very own.
A Sweet Legacy: Origins and Cultural Impact of Baklava
Baklava's journey through history is as rich and layered as the pastry itself. This iconic sweet, known for its myriad variations, is a beloved staple across the Mediterranean, Middle East, and Central Asia. Countries like Greece, Cyprus, and Türkiye fiercely claim baklava as their national treasure, and while its exact origins remain a subject of delightful debate among food historians, its widespread presence speaks volumes about its enduring appeal. Some theories suggest its lineage traces back to the Assyrians in the 8th century BC, while others point to the kitchens of the Ottoman Empire, where it was perfected and became a symbol of status and celebration.
Regardless of its precise birthplace, baklava has woven itself deeply into the cultural fabric of numerous societies. It's not just a dessert; it's a testament to hospitality, a centerpiece for festivities, and a sweet token exchanged during holidays and family gatherings. From bustling souks and elegant pastry shops in the Levant to traditional Greek kafenions, baklava is a common sight, often enjoyed with strong coffee or tea. Its preparation, often a communal activity, fosters a sense of togetherness, with recipes passed down through generations, creating cherished memories that last a lifetime. Making
homemade pistachio baklava, therefore, isn't just baking; it's participating in a centuries-old tradition of culinary artistry and shared joy.
Crafting Your Own Masterpiece: The Joy of Homemade Pistachio Baklava
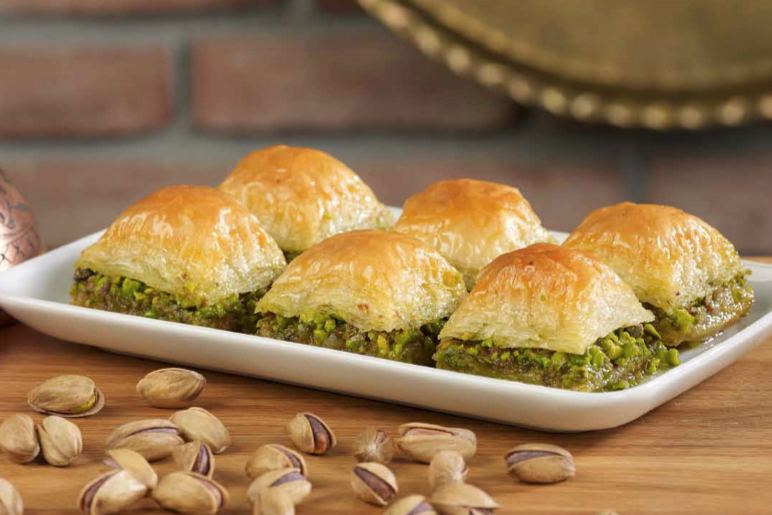
The decision to make baklava at home is a declaration of culinary ambition, yet one that yields immense satisfaction. The difference between store-bought and fresh,
homemade pistachio baklava is truly astounding. The delicate crispness of perfectly baked filo, the aromatic warmth of freshly ground nuts and spices, and the intoxicating sweetness of a homemade, citrus-infused syrup create an experience that industrial production simply cannot replicate.
To embark on this delightful journey, selecting the right ingredients is paramount. Think of them as the foundation for your edible masterpiece:
*
High-Quality Filo Pastry: This is the soul of baklava. Opt for a good brand of thin filo pastry sheets. The quality of your filo directly impacts the flakiness and texture of the final product.
*
Fresh, Unsalted Nuts: For pistachio baklava, fresh, unsalted pistachios are key. Their vibrant color and distinct flavor are irreplaceable. You might also consider a blend of pistachios and walnuts for added depth and complexity. Always ensure they are unsalted to control the overall flavor profile.
*
Aromatic Spices: Ground cinnamon and cloves are the classic warm spices that infuse baklava with its signature aroma. They complement the nuts beautifully.
*
The Secret Ingredient – Breadcrumbs: A subtle but powerful addition, fine breadcrumbs mixed with the nuts serve a crucial purpose: they absorb excess moisture and, more importantly, soak up that glorious syrup, ensuring every bite is moist and flavorful without being soggy.
*
Rich Butter: Unsalted butter, or even clarified butter (ghee), is essential for brushing between the delicate filo layers. It provides richness, helps create those crispy layers, and contributes significantly to the baklava's golden hue.
*
The Golden Elixir – Syrup Components: Granulated sugar and honey form the base of the luscious syrup. Infusing it with fresh orange peel adds a lovely citrus brightness that cuts through the sweetness, while an optional cinnamon stick in the syrup can further enhance its warm notes.
The entire process, despite its elegant appearance, can be broken down into three manageable steps: preparing the nut mixture, making the orange-infused honey syrup, and finally, layering and assembling the baklava for baking. What's even better is that the nut mixture and syrup can often be prepared ahead of time, making assembly on baking day a breeze.
Demystifying the Process: Step-by-Step for Perfect Homemade Pistachio Baklava
Creating
homemade pistachio baklava is a surprisingly straightforward endeavor when approached systematically. Here's a deeper dive into the steps, ensuring a truly exceptional outcome:
1. Crafting the Aromatic Nut Filling
The heart of your baklava lies in its nutty core. Begin by finely chopping your fresh, unsalted pistachios. If you're incorporating walnuts, chop them to a similar consistency. The goal is a uniform texture that isn't powdery but also not too chunky. In a bowl, combine the chopped nuts with your warm spices (cinnamon and cloves) and the secret weapon – the breadcrumbs. Toss everything gently to ensure an even distribution. This mixture is now ready, or can be stored for later.
2. Brewing the Golden Elixir: Orange-Infused Honey Syrup
The syrup is the lifeblood of baklava, imparting moisture, sweetness, and that irresistible glaze. In a saucepan, combine sugar, honey, and water. Add strips of fresh orange peel and, if desired, a cinnamon stick. Bring the mixture to a gentle boil, then reduce the heat and simmer for about 5-10 minutes until the sugar is fully dissolved and the syrup has thickened slightly. Avoid over-reducing it. Once done, remove from heat, discard the orange peel and cinnamon stick, and let the syrup cool completely. It's absolutely crucial that your syrup is cool when it meets the hot baklava – this ensures proper absorption without making the pastry soggy.
3. The Art of Layering and Assembly
This is where the magic happens. Prepare your baking pan – an 8" or 9" round cake pan is perfect for a small batch (serving 10-12), while a 13"x9" rectangular pan or two 8" pans will accommodate a doubled recipe for a larger gathering. Melt your butter and have a pastry brush ready.
- Prepare Filo: Carefully unroll your filo pastry. If using pre-cut rounds, they're ready. If your sheets are larger than your pan, you'll need to trim them to fit or fold them neatly. Keep any unused filo covered with a damp cloth to prevent drying.
- Butter Each Layer: Lightly brush the bottom of your pan with melted butter. Place your first sheet of filo, then brush it evenly with butter. Repeat this process for several layers (e.g., 6-8 sheets) to form the bottom crust.
- Add Nut Mixture: Sprinkle a generous, even layer of your prepared nut mixture over the buttered filo.
- Continue Layering: Place another filo sheet on top of the nuts, brush with butter, then add another layer of nuts. Repeat this process, alternating filo and nut layers, ensuring you reserve enough filo for the top. The number of layers can vary, but aim for a good balance.
- The Top Crust: Finish with a final stack of buttered filo sheets (again, 6-8 layers) to create a robust top crust. Make sure the top sheet is perfectly brushed with butter.
- Score Before Baking: This step is vital. Using a sharp knife, gently score the baklava into traditional diamond patterns, cutting all the way through the top layers but not necessarily to the very bottom. Scoring helps the heat penetrate evenly and makes serving much easier once baked.
4. Baking and The "Magic Moment"
Preheat your oven and bake the baklava until it turns a beautiful golden brown and the edges are crisp – this typically takes a good amount of time, allowing all those layers to cook through. The moment it comes out of the oven, steaming hot, immediately and generously drizzle the cooled orange-infused honey syrup all over the scored surface. You'll hear a satisfying sizzle as the syrup is rapidly absorbed. Garnish with a sprinkle of finely ground pistachios for visual appeal and an extra nutty crunch.
Now comes the hardest part: patience. Allow the baklava to cool completely and let it sit for several hours, ideally overnight. Baklava, much like fine wine, often tastes better the longer it sits, slowly absorbing the delicious syrup. In Greece, it’s typically made the day before it’s served for precisely this reason. For more detailed insights on handling phyllo and mastering syrup, explore our guide on
Mastering Homemade Pistachio Baklava: Tips for Perfect Phyllo & Syrup.
Making it Your Own: Customization and Serving Suggestions
While the classic
homemade pistachio baklava is undeniably perfect, there's always room for personal touches. Consider adding a hint of cardamom to your nut mixture for an even more exotic aroma, or substituting a portion of the pistachios with almonds or pecans for a different flavor profile. The syrup can also be customized with a splash of rosewater or orange blossom water for a distinct floral note.
Baklava is versatile in its serving. It’s a delightful accompaniment to strong coffee or a cup of hot tea, perfect for an afternoon treat or a festive dessert after a grand meal. Arrange the diamond-shaped pieces artfully on a platter, perhaps with a dusting of extra ground pistachios, and watch your guests' eyes light up. This impressive yet surprisingly approachable dessert is sure to become a beloved staple in your culinary repertoire, a testament to the joy of making it your own.
Conclusion
The journey of creating
homemade pistachio baklava is one that rewards effort with unparalleled deliciousness and a sense of profound satisfaction. From its ancient, storied origins to its cherished place in modern celebrations, baklava is more than just a sweet treat – it's an experience. By understanding its components, demystifying its preparation, and infusing it with your own care and creativity, you can bring this exquisite dessert to life in your own kitchen. So, gather your ingredients, embrace the layers, and prepare to delight yourself and your loved ones with the golden, nutty, syrupy perfection that is homemade pistachio baklava.